Wyrmway
More actions
This page is in the process of being constructed or reformatted. You are welcome to contribute as well. Last edited on 2025-08-26. If multiple days have passed since, this template should be removed. |
Wyrmway is a sub-quest of both Wyll's ![]() and his
and his ![]() . It is added to the journal after reading the book
. It is added to the journal after reading the book ![]() The Legend of Ansur.
The Legend of Ansur.

Objectives (Companion quest) edit
Objectives (Origin Quest) edit
Walkthrough edit
The Legend of the Ansur, the Great Wyrm edit

If Ulder Ravengard is saved, he gives the party the book and asks that they enlist the aid of the great wyrm Ansur.
If the Duke perishes, or Wyll breaks his pact, walking around in the Lower City may trigger an encounter with Counsellor Florrick, who confronts the party and accuses Wyll of killing his father. If Florrick is dead or still imprisoned, Cordula Eltan takes her place. If he is in the party, Wyll retorts that this is disinformation being spread by Mizora. Talking Florrick or Eltan down results in her providing the book to the party to begin the quest. If they cannot be dissuaded from attacking, the book can also be claimed from the corpse of Florrick or Eltan. Reading the book adds it to the journal and begins the quest.
Entering The Wyrmway edit
Ansur can be found by travelling to Wyrm's Rock Prison. Here, the party must travel down the western passage way to find two dragon sconces. The party can gain access to the secret passage by first hitting both dragon head torches with any source of ![]() damage such as
damage such as ![]() ,
, ![]() or
or ![]() . Once damaged by these means, the fire in torches become blue, and the wall between them reveals an illusion, granting passage. Note that firing arrows or casting spells is considered an attack, and may draw unwanted attention from the prison guards, notably Fist Ivarus, who patrols the inner corridor. Alternatively, the party can access Wyrm's Rock Prison by descending the cliffs outside Wyrm's Rock Fortress to the west side of the prison and entering through a mousehole.
. Once damaged by these means, the fire in torches become blue, and the wall between them reveals an illusion, granting passage. Note that firing arrows or casting spells is considered an attack, and may draw unwanted attention from the prison guards, notably Fist Ivarus, who patrols the inner corridor. Alternatively, the party can access Wyrm's Rock Prison by descending the cliffs outside Wyrm's Rock Fortress to the west side of the prison and entering through a mousehole.
Past the new opening is the antechamber. At the far end is a locked door, and a statue of Balduran, resembling those posted throughout the city, beside it. Interacting with the door or statue enacts a dialogue, where the latter in poetic verses suggests the player character is worthy enough to meet Ansur. The Emperor intercedes, trying to talk the player character out of exploring the Wyrmway, however, without any perseverance. Calling themselves worthy results in the statue unlocking and opening the door with another proclamation. Also, companions can succeed a ![]() DC 15 Arcana check to find out the statue is charmed with a
DC 15 Arcana check to find out the statue is charmed with a ![]() Magic mouth spell.
Magic mouth spell.
Interacting with the statue enables a passive ![]() DC 15 History check. The check is common with the another one at the murals on the wall nearby, which tell Ansur's history; it is not rolled again if deciphering of the murals was successful, and vice versa.
DC 15 History check. The check is common with the another one at the murals on the wall nearby, which tell Ansur's history; it is not rolled again if deciphering of the murals was successful, and vice versa.
If Wyll is in the party, the player character calling themselves worthy gains ![]() +3 from him. Telling Wyll the statue is probably addressing its call to him grants
+3 from him. Telling Wyll the statue is probably addressing its call to him grants ![]() +7.
+7.
Passing the Trials edit
The party must complete four trials to open the Dragon's Sanctum where Ansur, a Bronze Dragon, resides.
The purpose of these trials is to prove the party worthy of speaking with Ansur. To do so, they must pass trials titled Courage, Insight, Strategy and Justice (one per each of "four pillars of power", as cited by Wyll in party conversations). Failing any of the trials results in the party facing hostilities.[1]
There are four more statues of Balduran standing in a row in the central hall of the Wyrmway. Each depicts the founder of Baldur's Gate holding a symbol of one of the trials: a pair of scales for Justice, a Knight chesspiece for Strategy, a book for Insight, and a sword for Courage. Statues with the corresponding symbols stand also in each trial chamber. Successful completion of a trial has the matching statue in the central hall begin to glow.
Chamber of Justice edit

This trial takes place in the far left area, with no door.
The goal of this trial is to dismiss a dishonorable judge and issue a punishment commensurate to the committed crime. The story of the indictee in question is shown in six paintings starting from "The Apple" and ending with "The Judgement", each described by Narrator if interacted with. The paintings depict a man who steals apples to feed urchin children, then is hired to purloin a powerful artifact, chased and detained, and finally judged.
In the middle of the chamber stands a stone dais with three more pictures on bookstands. These depict possible judgements which may be passed on the culprit by the player character, but are covered in shadow by the dishonorable Judge standing in the middle of a binding circle, covered with a globe-like shrouded area. If spoken with, the Judge barks at the party, saying he has prepared the decision, and none should interfere. To choose and declare their own sentence, the party must first extinguish the shadow shroud covering the paintings.
The Judge resembles a common Shadow encountered in Act Two, but is invulnerable to all damage sources and cannot be pushed away by any means; it must be dismissed magically.
Known ways to remove the judge:


 (teleporting the judge anywhere outside the circle)


 (The Dark Urge exclusive)

It is also possible to use spells that exploit the Judge's damage field avoidance behaviour, pushing it out of the circle. However, if the spell area is not sufficient to displace the Judge out of it completely, the shadow stays nearby and floats back to its place once the party member stops concentrating[2]. Known spells which accomplish this include:

 (casting it nearby and manually guiding it to make the Judge leave the circle)


Finally, it is possible to interact with the shadowed paintings directly by a ![]() spell, but each painting requires an individual spellcast to be cleared.
spell, but each painting requires an individual spellcast to be cleared.
After lifting the shadows, each of the three shadowed paintings can be picked up or inspected. They are named The Cell, Freedom, and The Hanging and represent the possible sentences for the committed crime. One of them must be placed upon the empty bookstand named "The Waiting Judgement" behind the Judge's back.
To solve the trial, the sentence needs to be proportional to the crime. When interacting with the statue, if Wyll is in the party, he offers a hint regarding the answer: "The right path (to justice) often lies between the extremes." Hence, the correct solution to the trial is choosing The Cell painting and placing it on the empty bookstand. Inserting Freedom or The Hanging into the niche fails the trial and summons a horde of hostile undead (see below).
On a granite bench near the shrouded paintings in the chamber ![]() Journal of Past Adventurers Nº2 can be found.
Journal of Past Adventurers Nº2 can be found.
Chamber of Insight edit

The way to this trial lies over a nearly invisible path between the two left-hand statues of Balduran. In this trial the party must discern which advice for the city's ruler is not useful and even harmful for further prosperity.
The chamber itself is a vast cave resembling a library, with a meandering path leading almost back to the entrance, with multiple bookcases arranged along both sides. In the far end of the path there is a stone dais with three blood-red ghosts of the advisors: Paul Amaps, Cristina Suelto, and Alwin Stedd.
To ascertain whose assertion is wrong the party must read three books, penned by each advisor:
These books, however, do not lie peacefully on the shelves, but flutter around: one at the start of the path, one within the middle widening, and the last close to the end.
Catching the fidgety books manually requires a ![]() DC 15 Sleight of Hand check. Only one attempt can be made made for each party member throughout the trial (therefore, if any companion fails to catch a book, they cannot try again on another). The books can be downed or stopped in the flight by using
DC 15 Sleight of Hand check. Only one attempt can be made made for each party member throughout the trial (therefore, if any companion fails to catch a book, they cannot try again on another). The books can be downed or stopped in the flight by using ![]() ,
, ![]() ,
, ![]() ,
, ![]() or similar spells. It is also possible to throw the books to stop them from flying. Activating Turn-based mode when near a book makes interacting with them easier, but still requires to roll a check or use a spell. Attacking the books is not recommended, as they may be destroyed in doing so.
or similar spells. It is also possible to throw the books to stop them from flying. Activating Turn-based mode when near a book makes interacting with them easier, but still requires to roll a check or use a spell. Attacking the books is not recommended, as they may be destroyed in doing so.
Reading the books reveals Suelto adopted a cruel ideology, actually proposing to raze enemy's lands to the ground despite their surrender, in order to hinder their ability to go to war once and for all, proving she is the one who should be eliminated.[3] If Wyll is in the party, it is possible to speak with him after reading the final book; he also advises Suelto is the one to attack.
All ghosts in the end of the chamber have 1 HP, so a single strike is sufficient. Attacking Suelto at the end of the chamber results in the party correctly passing this test. Failing the trial summons a number of hostile undead.
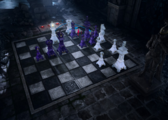
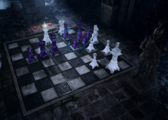
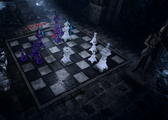
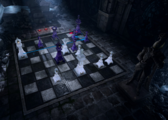
Chamber of Strategy edit

This trial takes place in the lower right-hand room. The way to the actual trial is blocked by a bunch of Attuned Crystals, which may be destroyed, walked around (from the left side) or jumped / flown over.
In this trial it is necessary to solve a lanceboard problem (a chess-like game common within Forgotten Realms) by delivering checkmate to Black in two moves only. If Gale is in the party, he offers his help [4]. Agreeing to use his advice grants the player character a ![]() +1 point of the wizard's approval.
+1 point of the wizard's approval.
There are three[5] possible lanceboard problems, which might be offered to the party to solve. The particular setup is defined randomly (presumably at the beginning of the game), so it is not possible to re-enter the Wyrmway to change it. The problems and their solutions are as follows:
Suggested by Gale:
- (1) Moving the White Rook one square to the right, thus threatening the Black King. The further decision depends on the Blacks' response:
- (1-1) Option 1 - Black Bishop takes the White Rook, which allows the White Queen to move 3 squares to the right and deliver a checkmate.
- (1-2) Option 2 - Black King retreats, making one pace to up-and-right square, and moving the White Knight one square up and two squares left causes a checkmate.
- (2) Moving the White Queen diagonally to the upper right corner of the board checks the Black King. Its only movement to safety is the black square on its forward left diagonal. Afterwards, White Queen goes four squares to the left, directly in front of the White Rook and diagonal to the Black King, which delivers a checkmate.
- (3) Moving the White Queen all the way across and take the Black Pawn. This checks the Black King as well, forcing him to retreat a square left. The White Queen then takes the other pawn, one square up and left, protected from other black pieces by the White Bishop.
An alternative "brawn" solution is to destroy the Black King piece (featuring 50 HP on Balanced) with ![]() damage, which it is vulnerable to. "Killing" it this way also results in passing the challenge.
damage, which it is vulnerable to. "Killing" it this way also results in passing the challenge.
There are three attempts to finish this trial correctly, the reminder indicated by the number of red heart-shared crystals left at the top of the board; each failed attempt results in one "heart" shattering. Additionally, whenever interacting with one of the Lanceboard pieces, there is an indicator showing where the pieces can move, according to the standard rules of chess. If Gale is a member of the party and the player character agreed to take his advise, upon choosing an appropriate piece the correct move is highlighted white.
At the feet of statue of Balduran in thes chamber ![]() Journal of Past Adventurers Nº3 can be found.
Journal of Past Adventurers Nº3 can be found.
For more information on lanceboard game, see ![]() Lanceboard on the Forgotten Realms Wiki.
Lanceboard on the Forgotten Realms Wiki.
Lanceboard problems that may be offered edit
-
 Setup 1 and its first solution.
 -
 Setup 1 and its second solution.
 -
 Setup 2 and its solution.
 -
 Setup 3 and its solution.


Chamber of Courage edit
This trial takes place in the right most chamber. It is a cave with a roundish ground crossed by a water stream, and a Statue of Balduran in the centre. At the statue's feet stands a ![]() Cemetery-Blue Torch, its flames glowing cyan. The four stone orbs are standing around the edges of the area.
Cemetery-Blue Torch, its flames glowing cyan. The four stone orbs are standing around the edges of the area.
This is a fighting trial that lasts 4 turns. Throughout it, one of party members holds the torch in their hand (equipped as a weapon) and must withstand the elements' attacks to pass the test. The party member interacting with the Balduran statue becomes the "torch carrier" for the trial. They must survive (stay alive and not ![]() ) by any means possible. Thus, the rest of the party should defend the torch carrier. The torch is bound to the torch carrier, preventing other weapons from being equipped and preventing the torch from being passed to others. As such, it is recommended to be held by spellcasters, or any class not dependent on their main-hand melee weapon. The torch is one-handed; off-hand weapons and shields are unaffected.
) by any means possible. Thus, the rest of the party should defend the torch carrier. The torch is bound to the torch carrier, preventing other weapons from being equipped and preventing the torch from being passed to others. As such, it is recommended to be held by spellcasters, or any class not dependent on their main-hand melee weapon. The torch is one-handed; off-hand weapons and shields are unaffected.
Elementals will spawn on the following turns:
- Turn 1: 2x Air Elemental and 2x Water Elemental
- Turn 2: 1x Air Myrmidon and 1x Water Myrmidon
- Turn 3: 1x Air Myrmidon and 1x Water Myrmidon
- Turn 4: None
The torch carrier is marked with a ![]() , which prevents them from turning
, which prevents them from turning ![]() and makes them a prime target for the elementals in this trial. Applying
and makes them a prime target for the elementals in this trial. Applying ![]() or casting
or casting ![]() on the torch carrier trivializes the entire encounter, as this prevents enemies from targeting the torch carrier. The elementals may then be killed by others directly, or shoved over the edge of the arena they spawn near to kill them instantly.[6]
on the torch carrier trivializes the entire encounter, as this prevents enemies from targeting the torch carrier. The elementals may then be killed by others directly, or shoved over the edge of the arena they spawn near to kill them instantly.[6]
The Attuned Crystals that grow inclusters around the area can be shattered during the battle to give any nearby character resistance to elemental damage for 2 turns, granting them ![]() condition.
condition.
The four orbs around the ground are merely counters of how many turns elapsed. They start emitting electric charges one by one as the battle proceeds. They do not attack and have no impact on combat.
If the torch carrier is alive and not ![]() by the end of the fourth turn (regardless of how many enemies survived), they pass this trial and may proceed. The trial is failed if the torch carrier is downed or killed.
by the end of the fourth turn (regardless of how many enemies survived), they pass this trial and may proceed. The trial is failed if the torch carrier is downed or killed.
On the stone edge in the souther part of the chamber ![]() Journal of Past Adventurers Nº4 can be found.
Journal of Past Adventurers Nº4 can be found.
Failing a Trial edit
If failing any trial, the party are attacked by several groups of undead, one wave in each uncompleted chamber and another in the central area. Once all the undead have been dispatched, the party can proceed in spite of their failure, and without needing to complete any remaining trials. Failing a challenge is the only way to obtain ![]() Journal of Past Adventurers Nº5 and find out what happened to the party's predecessors. The maximal set and number of hostiles to be fought consist of:
Journal of Past Adventurers Nº5 and find out what happened to the party's predecessors. The maximal set and number of hostiles to be fought consist of:
- Fallen Champion - 4x
- Fallen Fighter - 16x
- Fallen Ranger - 15x
- Fallen Wizard - 7x
Failing any trial renders the need to complete any remaining trial obsolete, but they still are allowed to proceed into the Dragon's Sanctum.
The Lair of the Great Wyrm edit
After successfully completing all four trials (or failing any of them and defeating all the spawned undead) the door in the main hall is unlocked, granting access to The Dragon's Sanctum, where Ansur is said to lie in wait.
While exploring deeper in the Sanctum, it is revealed the great protector of the city has actually long turned into a rotten carcass, prostrated in the middle part of the Sanctum. All possible companions comment on this, with either regret, irony or admiration with the creature's former magnificence.

Ansur's body can be interacted with, initiating a conversation[7] between the player character, Ansur and The Emperor, with the player character's body being used as a conduit for the dragon's spirit. Throughout the conversation, it is unveiled that the Emperor is actually none other than Balduran, the legendary adventurer who founded the city of Baldur's Gate. Faulting the illithid for murdering him, Ansur calls it "faessi", meaning "coward" in Draconic language. Breaking the player character off mid-word, the wyrm-spirit calls them "vrak" ("child") or, if they are a ![]() , "ux Bahamuti" ("Bahamut's progeny").[8]
, "ux Bahamuti" ("Bahamut's progeny").[8]
Fighting Ansur edit
If spoken with, regardless of chosen dialogue lines, Ansur calls out the Emperor and reanimates as a hostile undead; the party must then inevitably fight the dragon and two Water Myrmidons which spawn in the steam clouds at the far sides of the cave. Defeating Ansur marks the quest as completed.
After fighting the remains of the Great Wyrm edit
After defeating Ansur, another conversation with the Emperor is triggered immediately. The Emperor confirms actually being Balduran in the past, and once again tells its story of an adventurer being captured and infected by illithids, along with new details on Ansur's role in this part of its existence. Regardless of the player character's reaction, the Emperor seemingly feels few regrets on its deed, offering as an explanation necessity and the will to survive.
In the northern part of the cave the ![]() Helm of Balduran lies on an altar. The altar is a kind of a pressure plate: taking the helm off it opens the illusory wall which leads back to the spelean[9] tunnel to Wyrm's Rock Prison. The Helm can be taken without interacting with the remains of Ansur at all.
Helm of Balduran lies on an altar. The altar is a kind of a pressure plate: taking the helm off it opens the illusory wall which leads back to the spelean[9] tunnel to Wyrm's Rock Prison. The Helm can be taken without interacting with the remains of Ansur at all.
After defeating Ansur, it is advisable to return to camp to inform Duke Ravengard (if he lives), and Wyll can come to a decision about his future. Wyll may decide to become the Blade of Avernus, or follow his father's political path of Grand Duke of Baldur's Gate.
Rewards edit
 Balduran's Giantslayer - looted from Ansur
 Helm of Balduran
Achievements edit

- Crash Landing
- In the Wyrmway, wait until the dragon is mid-flight, then knock it out of the sky - KAPOW.
Notes edit
- ↑ The party is awarded due XP and always allowed to proceed to the Dragon's Sanctum at the end of the trials, regardless of success or failure and any subsequent hostilities.
- ↑ To prevent a spell from being wasted, remember the Judge drags its shrouding globe with them when seeking to avoid impact, and flies away once the globe has left the binding circle. For example, the diameter of
 spell area is unsufficient to chase the shadow off.
- ↑ The party may learn of Suelto's ideology earlier in Act Two by recovering a similar book titled,
 Suelto's Ethics of War from Ketheric's chambers on the first floor of Moonrise Towers. This book appears to serve as Ketheric's ideology on conflict in general and warfare in particular.
- ↑ Gale chimes in when the player character interacts with the Statue of Balduran to know the task at hand. If he is currently chosen as an active character, another party member should be chosen and speak to the statue again, to hear the wizard's experienced opinion. If Gale is played as an Origin, he utters the solution automatically, and it is shown above his head like a location remark or party banter line
- ↑ In-game dialogue file imply the fourth board setup that is never run. However, Gale would describe its solution as such: "First, the white queen moves up and right, diagonally, two squares. This allows her to threaten black's king, while protected by her white knight. The king then has no choice but to take the knight, ensnaring himself him between his own pawn and bishop. The white queen can then checkmate by moving one more square up and to the right."
- ↑ Air elementals are immune to
 but can be knocked back by other means such as
- ↑ The synopsis to the correspondent dialogue file implies that initially the conversation was prompted by any party member attempting to take the Helm of Balduran from the altar behind Ansur. However, as of Patch 8 it is possible to walk the around dragon's remains, loot the helm and leave the cave without waking up Ansur. In this case, all due inspirational events concerning the helm are granted as usual. The conversation (and consequent fight) now enacts only if interacting with the wyrm's corpse.
- ↑ This is not accurate, because according to Forgotten Realms lore Bahamut is said to be the progenitor of the dragons (and, subsequently, the Dragonborn) of "metallic" subraces only. Progenitors of other subspecies are reputed to be Tiamat ("elemental", or chromatic dragons) and Sardior (extremely rare "gem" dragons). For more information, refer to
 Dragonborn on the Forgotten Realms Wiki.
- ↑ "Spelean" is an adjective meaning related to, found in, or inhabiting caves, derived from the Latin word for cave (spelaeum). The term is used in the study of caves and their features, as in "spelean animals" or the "Journal of Spelean History". It can also refer to a fictional species of bat-like humanoids from the Masters of the Universe franchise that live in the underground areas of Eternia.