Grym
More actions
Overview edit
Grym is the eternal golem guardian of the Adamantine Forge hidden away in Grymforge. It is made of adamantine and defends the forge against any who might try to use it.
If the Adamantine Forge is used, Grym activates and attempts to destroy its users.
Combat edit
Attacks and abilities edit
Honour mode edit
Immunities edit


 created by
  Lava
Lava


Encounter details edit
Grym can send melee attackers ![]() . Its
. Its ![]() passive renders it immune to all damage until it is
passive renders it immune to all damage until it is ![]() by standing in lava; this also removes its
by standing in lava; this also removes its ![]() passive. Once superheated,
passive. Once superheated, ![]() damage is most effective against Grym. Grym cannot be
damage is most effective against Grym. Grym cannot be ![]() or
or ![]() .
.
New Resistances when superheated:
![]()
![]()
![]()
![]()
![]()
![]()
![]()
![]()
![]()
![]()
![]()
![]()
![]()
Grym's ![]() passive causes it to gain the condition
passive causes it to gain the condition ![]() when attacked, which marks the attacker with
when attacked, which marks the attacker with ![]() . Grym chases and attacks the prime target, which can be utilised to lure the golem into lava - or beneath the hammer of the Adamantine Forge itself. Pulling the forge lever while Grym is superheated and standing on the central anvil hammers it for 12d8
. Grym chases and attacks the prime target, which can be utilised to lure the golem into lava - or beneath the hammer of the Adamantine Forge itself. Pulling the forge lever while Grym is superheated and standing on the central anvil hammers it for 12d8![]() damage (which is doubled due to bludgeoning vulnerability when superheated) and knock it
damage (which is doubled due to bludgeoning vulnerability when superheated) and knock it ![]() . However, damaging Grym with the forge immediately removes Grym's
. However, damaging Grym with the forge immediately removes Grym's ![]() condition and can summon a group of Magma Mephits, though the mephits may eventually appear once Grym is sufficiently damaged. Hammering Grym while not superheated knocks it prone but does no damage and might still summon Magma Mephits.
condition and can summon a group of Magma Mephits, though the mephits may eventually appear once Grym is sufficiently damaged. Hammering Grym while not superheated knocks it prone but does no damage and might still summon Magma Mephits.
Tactics edit
Regardless of the party's approach, some method of triggering the lava valve is required because the lava recedes after two turns, making the golem invincible again. Some ways of triggering it are: one party member can stand near the lava valve, it can be activated with ranged attacks, a ![]() can trigger the valve by attacking it, or a
can trigger the valve by attacking it, or a ![]() can interact with the valve in place of a party member. However, using a familiar or Mage Hand for the initial activation of the lava valve may bug the encounter and prevent Grym from spawning.[See: Bugs]
can interact with the valve in place of a party member. However, using a familiar or Mage Hand for the initial activation of the lava valve may bug the encounter and prevent Grym from spawning.[See: Bugs]
Before the fight, it is wise to spread out the party, placing casters in the back and melee up front near the gate where Grym appears. Using elixirs such as ![]() Elixir of Hill Giant Strength and
Elixir of Hill Giant Strength and ![]() Elixir of the Colossus noticeably boosts melee fighters. Before turning the valve, ensure all party members are standing on raised areas and enter Turn-Based Mode to prepare additional short duration buffs. It is advisable to
Elixir of the Colossus noticeably boosts melee fighters. Before turning the valve, ensure all party members are standing on raised areas and enter Turn-Based Mode to prepare additional short duration buffs. It is advisable to ![]() melee characters for the extra attack and added AC. Applying weapon oils such as
melee characters for the extra attack and added AC. Applying weapon oils such as ![]() Oil of Accuracy boosts the Attack Rolls to more easily beat Grym's high AC. Lastly, have party members use weapons that deal
Oil of Accuracy boosts the Attack Rolls to more easily beat Grym's high AC. Lastly, have party members use weapons that deal ![]() damage to exploit Grym's vulnerability.
damage to exploit Grym's vulnerability.
In Honour mode, ![]() : Halt is especially useful because of its potential to prevent Grym from using
: Halt is especially useful because of its potential to prevent Grym from using ![]() , dishing out large amounts of melee damage, or providing a pause in the fight to heal the party. This can occasionally prevent the Magma Mephits from spawning.[Needs Verification] Also in Honour mode,
, dishing out large amounts of melee damage, or providing a pause in the fight to heal the party. This can occasionally prevent the Magma Mephits from spawning.[Needs Verification] Also in Honour mode, ![]() prevents
prevents ![]() from inflicting
from inflicting ![]() damage, although it might not prevent the shockwave's 4 m (13 ft) knockback.
damage, although it might not prevent the shockwave's 4 m (13 ft) knockback.
Hammer tactic edit
One of the easiest ways to defeat Grym is by using the Adamantine Forge's hammer. The hammer used to forge the adamantine weapons, armor, and equipment is active during each turn of the fight, and deals 12d8 bludgeoning damage. Positioning your party on each lava-free island allows you to take advantage of ![]() to lure Grym under the hammer. Only one leg needs to be on the pedestal for a full hit. As with other tactics, it is vital for the party to be able to activate the lava valve and hammer lever; either with party members nearby, summons capable of this interaction, or party members shooting arrows at the valve/lever. Magma mephits spawn on the bottom right island, so having a party member with some form of fire resistance is advised.
to lure Grym under the hammer. Only one leg needs to be on the pedestal for a full hit. As with other tactics, it is vital for the party to be able to activate the lava valve and hammer lever; either with party members nearby, summons capable of this interaction, or party members shooting arrows at the valve/lever. Magma mephits spawn on the bottom right island, so having a party member with some form of fire resistance is advised.
Ranged bombardment tactic edit
One possible tactic against Grym is using an all-Ranged setup that takes advantage of the terrain. Grym has no ranged attacks, so if the party shoot it from positions it cannot reach, they can slowly destroy Grym without taking damage. Note that to use this tactic and continue using the forge to craft equipment, the party must raise the forge back up after the fight. This can be done either by shooting an arrow at the button raising the forge or with one party member using ![]() ,
, ![]() ,
, ![]() , or
, or ![]() to reach the lowered forge and press the button.
to reach the lowered forge and press the button.
Surrounding the forge, there is the stairway the party members approach from and a second pathway to the right of it. When the forge is lowered, ranged characters (both magic users and archers) can hit nearly the entire forge floor where Grym can move from the area on the right, and characters on the entry stairway can also hit the Lava Valve.

See the image to the right for reference.
Characters are needed at both positions. Characters on the right are unable to reach the lava valve to Superheat Grym to make it vulnerable to damage. However, there is a section of raised floor just under the left position that Grym can stand on where it does not get Superheated, so party members need to keep it by the Right position to keep it vulnerable to damage. From this position, there is no safe floor area for Grym.
Due to ![]() , Grym always follows the last character that hit it, if able. In the character turn order, always make sure that the last one to hit Grym was on the Right platform. It then walks to that character's position and stays there every round until it dies or is lured by another to a different position. Make sure the character(s) on the Right side can fire multiple ranged attacks per turn to reduce the chance of them all missing and Grym moving to the left side and potentially onto a safe floor section from Superheating.
, Grym always follows the last character that hit it, if able. In the character turn order, always make sure that the last one to hit Grym was on the Right platform. It then walks to that character's position and stays there every round until it dies or is lured by another to a different position. Make sure the character(s) on the Right side can fire multiple ranged attacks per turn to reduce the chance of them all missing and Grym moving to the left side and potentially onto a safe floor section from Superheating.
At this point, continue hitting Grym, having a character on the left side put a shot into the lava valve whenever the lava clears, and always having the characters on the Right side move last. It may take a while, but you will be able to drop Grym without getting wounded and without needing to use the forge hammer, which is needed for obtaining an Achievement (listed below).
Minor illusion tactic edit
This strategy improves on the ranged bombardment tactic by using the ![]() cantrip to lure Grym onto the central anvil.
Rather than using ranged attacks and spells to damage Grym, which can take a long time, the party use the hammer to deal large amounts of damage at a time, reducing the combat to about five rounds.
As in the ranged bombardment tactic, the height advantage is used by placing characters on the elevated positions to maintain a safe distance, using ranged attacks and spells to manipulate the lava valve and hammer.
cantrip to lure Grym onto the central anvil.
Rather than using ranged attacks and spells to damage Grym, which can take a long time, the party use the hammer to deal large amounts of damage at a time, reducing the combat to about five rounds.
As in the ranged bombardment tactic, the height advantage is used by placing characters on the elevated positions to maintain a safe distance, using ranged attacks and spells to manipulate the lava valve and hammer.
- Grym must be
 by activating the lava valve. If it is not Superheated, a character can hit it or use
  on a lower surface to lure it to an area where it is affected by the lava before using the lava valve.
 - Once Grym is Superheated, Minor Illusion should be used on the opposite edge of the central anvil. This causes Grym to move onto the anvil to investigate. Grym's extremely low Intelligence score means it almost always fails the Investigation check.
- The hammer lever must be activated by hitting it with a ranged attack or spell. The first time this happens, Magma Mephits spawn below.
- Grym loses the Superheated condition and is knocked
 . It remains invulnerable until its next turn, at which point the Superheated condition must be reapplied.
These steps must be repeated until Grym is defeated.
Throwing water tactic edit
Similar to ranged bombardment, but exploiting Grym's weakness to Bludgeoning damage, the extra damage applied for "gravity" when throwing from a great height, and the easy availability of water jugs. In this version leave three party members up on the entrance steps, supplied with lots of ![]() Water bottles. Because thrown water does Bludgeoning damage and has a gravity bonus when thrown from up high, Grym takes 20+ damage on most hits, and even most "misses" because of the gravity applied to the water spread.
Water bottles. Because thrown water does Bludgeoning damage and has a gravity bonus when thrown from up high, Grym takes 20+ damage on most hits, and even most "misses" because of the gravity applied to the water spread.
The fourth party member remains on the platform to operate it and keep Grym standing in the lava, and should have access to rapid movement spells like ![]() . When only one party member is on the platform, Grym ignores any threat assessment and pursues the single accessible character. It is arguably most efficient to keep Grym lured toward always standing in the lava, rather than attempting to use the forge hammer, as regaining Superheated status can sometimes prove a challenging maneuver. This throwing technique can also be used while keeping all four party members "up top" as in the above method, gaining more safety but perhaps making maneuvering Grym into the lava more challenging.
. When only one party member is on the platform, Grym ignores any threat assessment and pursues the single accessible character. It is arguably most efficient to keep Grym lured toward always standing in the lava, rather than attempting to use the forge hammer, as regaining Superheated status can sometimes prove a challenging maneuver. This throwing technique can also be used while keeping all four party members "up top" as in the above method, gaining more safety but perhaps making maneuvering Grym into the lava more challenging.
Owlbear from the top ropes tactic edit

It is possible to defeat Grym in a single hit. In order to do so, the party need:
- A level 6 druid in
 (If your druid is lower than level 6, you can do this with
  or
or  ).
). - A spellcaster who can
 the druid.
 - An
 Elixir of the Colossus drunk by the druid.
This tactic works because when the druid drinks an ![]() Elixir of the Colossus, wild shapes, and then receives the Enlarge spell, their size increases to Gargantuan and their weight increases to 50,005 kg.
Elixir of the Colossus, wild shapes, and then receives the Enlarge spell, their size increases to Gargantuan and their weight increases to 50,005 kg.
By having the druid remain on the stairs, rather than jumping down onto the platform, they maintain a large vertical distance from the lowered platform when Grym spawns. They can then use ![]() on Grym, negating any fall damage while dealing massive damage due to their large weight and falling distance. If using any of the other Large Wild Shape forms, use
on Grym, negating any fall damage while dealing massive damage due to their large weight and falling distance. If using any of the other Large Wild Shape forms, use ![]() or similar effects and just regular jump. Make sure to land as close to Grym as possible without hitting him directly, and avoid landing near an ally, or they will be killed as well.
or similar effects and just regular jump. Make sure to land as close to Grym as possible without hitting him directly, and avoid landing near an ally, or they will be killed as well.
Paired with Grym's vulnerability to bludgeoning damage while Superheated, the crushing damage should defeat it instantly, even on Tactician or Honour difficulty.
This tactic can be finicky. Key tips to making this happen are:
- Crouch before jumping.
- Stand high up on the stairs while still being able to reach Grym.
- Reloading after buffing is not recommended because it may reset the weight and ruin the damage.
If having difficulty executing this strategy, verify these steps:
- Grym is Superheated in lava.
- Buff order and weight: apply Elixir of the Colossus, then Wild Shape, then Enlarge, and verify weight; avoid reloading to after this point.
- Target the ground just adjacent to Grym, not Grym’s model, so that the jump path passes through it. When targeting Crushing Flight, Grym should be red-highlighted but no percentage to hit should appear.
In most cases this tactic still deals enough damage to kill Grym in one hit with only one source of enlargement (either elixir or spell).
Loot edit
Related literature edit
Related quests edit
Achievements edit

- A Grym Fate
- Kill the Adamantine Golem without using the Forge Hammer.
Gallery edit
-
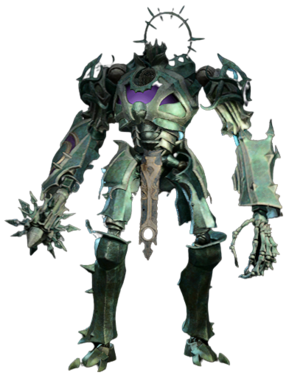 Model
Model -
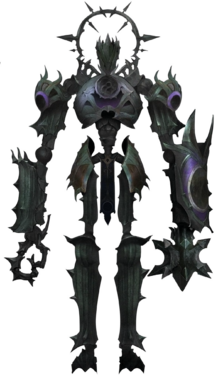 Concept art.
 -
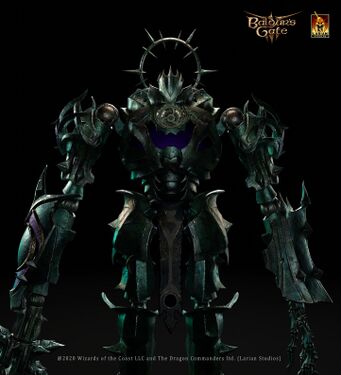 Official Concept Render by Gino Luka Kölling, concept art by Jane Katsubo for Larian Studios.


Notes edit
- Although
 cannot damage Grym, it prevents it from taking opportunity attacks (thus allowing the party to move around near it more freely) and the attack roll always has advantage as Grym's body counts as metal armour.
 - As of Hotfix 6 there is no cooldown for the application of . Thus, it is possible to reapply the effect by activating the lava valve (has a slight delay, check Grym for status effects) and consequently hitting Grym with the hammer multiple times per turn. This can be easily achieved by placing a character within shooting distance of both the lava valve and hammer lever and then shooting them both with arrows. For example a
 lvl 3 Thief / lvl 2 Fighter has essentially 5 actions when dual wielding hand crossbows, and can kill Grym in a single turn of combat at tactician difficulty; Grym must first lured under the hammer with a second character, and then stand with one leg in the lava and the other under the hammer.
 - Grym cannot be moved by force, not even when
 or
or  .
.
Quotes edit
| “ | Unstoppable juggernauts that exist only to follow their creator's orders, even if that creator has long since passed. |
„ |
Bugs edit
- Using a familiar or Mage Hand for the initial activation of the lava valve prevents Grym from spawning.
- Leaving the fight with a character on the ledge and reentering the forge stops the ability to turn the lava back on, making the forge unusable.[Needs Verification] However, it is still possible to kill Grym by sending a polymorphed lava elemental to him. The elemental creates Lava under Grym and makes him superheated.